Quickstart Guide
Quickstart Guide
First-time setup: 15–20 minutes
Step 1. Download the Sentinare App
Search for “Sentinare” in the App Store or Google Play Store, or use the links below.
Step 2. Create a Sentinare Account
Open the app and tap Create an Account. (This is separate from your website store account)
- Select Your Region: Tap the pencil icon to pick your server region (Canada, US, Europe or China). Because sensors are whitelisted by purchase region, you must select the correct country. If you live outside these three regions, choose the US server.
- Verify Email: Enter your details and sign up. If your email verification code doesn’t arrive within a few minutes, check your spam folder.
- App Permissions: Allow all permissions when prompted, including notifications, Bluetooth, location, etc.
⚠️ Important: To guarantee you receive alerts, disable any phone power-saving settings for the Sentinare app so it can run reliably in the background.
Step 3. Add the Sensor to Your Account
📶 Wi-Fi Requirements:
- Connection: Ensure you have reliable Wi-Fi
- Sentinare 3: Supports 2.4GHz only (if your home router is 5GHz-only, you can bridge it using a dual-band Wi-Fi extender – see below for details).
- Security: Must use WPA2-PSK (WPA2-Personal) protocol.
We recommend pairing your sensor and connecting it to Wi-Fi before mounting it to the wall. This makes troubleshooting easier if you hit any network snags.
- Power On: Plug in the sensor. Wait 20+ seconds for the LED indicator to flash white (the top button is for factory reset – no need to press it).
- Pair the Device: In the app, go to the Rooms then tap on your default room name to expand it, and press Add Device. A sensor can only be linked to one account at a time.
- Select & Name: Choose your sensor from the list by matching its serial number (the physical sensor’s LED will flash green to confirm your selection). Give it a custom name.
- Connect Wi-Fi: Select your network and enter your password. The sensor’s LED will cycle through colors: red ➔ yellow ➔ blue ➔ steady green: when successfully connected to the server.
- Firmware Upgrade: If the app prompts you, update the firmware so you have the latest AI improvements. The sensor may reboot a few times before returning to a steady green light.
- Skip Calibration (For Now): When the app asks you to calibrate, tap Later. We will do this right after the physical installation.
Using a Wi-Fi Extender (For Weak or 5GHz-Only Networks)
If your router has only 5GHz or the signal is too weak where you want to mount the sensor, you can bridge it using a dual-band Wi-Fi extender. Excellent options include:
- Amazon US: TP-Link AC750 Extender
- Amazon Canada: TP-Link AC750 or TP-Link AX1500
Make sure to enable 2.4 GHz during your extender setup so Sentinare can see it.
Step 4. Mount the Sensor
Unplug the sensor and choose your mounting spot. We recommend securing it temporarily (with tape or temporary strips) just in case you need to adjust its angle after the next calibration step.
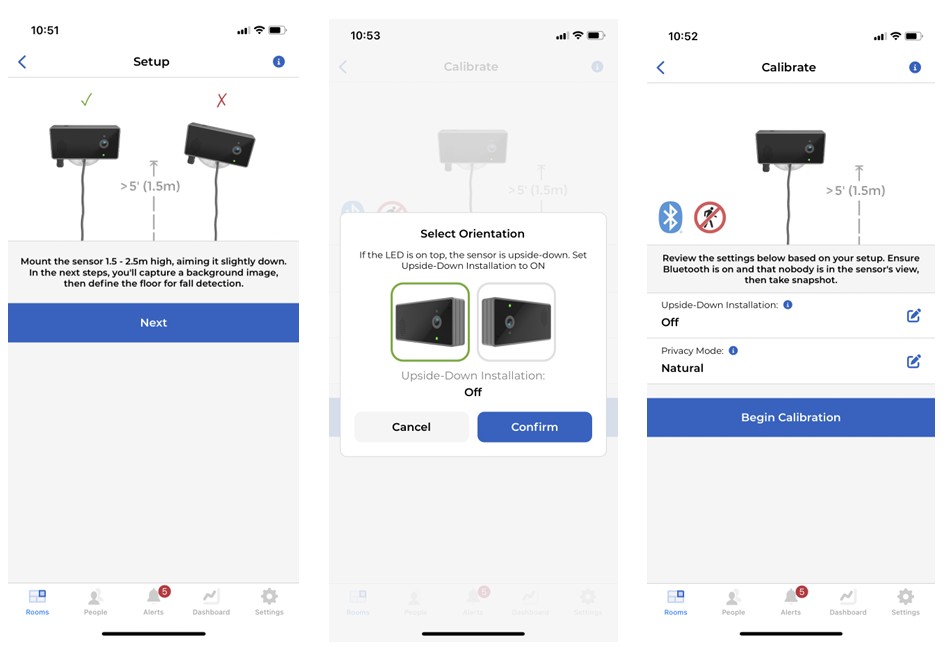
- Ideal Height: Mount the sensor between 1.5 to 2.5 meters (5 to 8 feet) high.
- For Facial Recognition (optional): Keep it under 2.0 meters (6.5 feet) so the sensor can clearly capture faces.
- The Vertical Alignment Rule: Tilt the sensor downward slightly so it has a clear view of the floor. The sensor body must be perfectly upright- the line running between the lens and the LED indicator light must be perfectly vertical. If the sensor is skewed, the AI may trigger false alarms.
- Upside-Down Mounting: The bracket can be mounted on walls, ceilings, or flat surfaces. You can install the sensor upside-down, but make sure to toggle Upside-Down Installation during in-app calibration later.
- Power Cable: Sentinare 3 comes with an 8ft Type-C USB cable. You can swap this out for a longer third-party Type-C cable if needed, provided it can supply up to 2A of current.
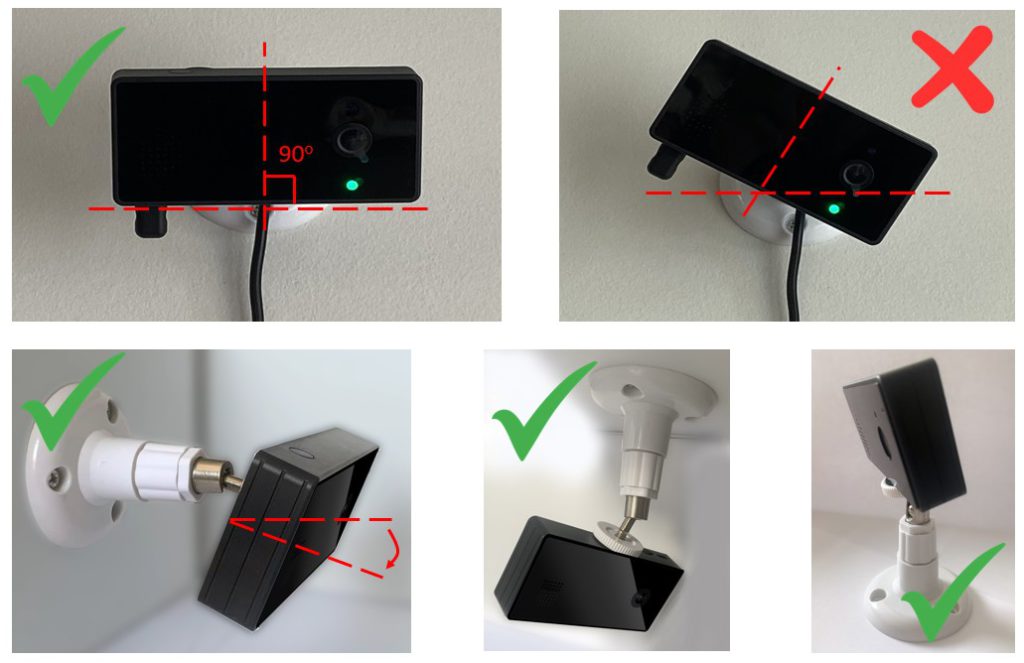
If you are setting up the older Sentinare 2 sensor (with the optional ball head mount), please note its specific power requirements:
- ⚠️ Use the Included Power Kit Only: Always use the provided USB power adapter and the provided micro-USB cable. Do not swap these out for 3rd party USB cables or alternative phone chargers, as they cannot supply enough stable power to the sensor.
Other Mounting Options
The Sentinare sensor features a standard 1/4″-20 tripod screw thread, making it compatible with a variety of 3rd party mounting stands. For flexible positioning, you can use adhesive stands with 360-degree ball heads, or swap the standard double-sided adhesive tape for fasteners like Velcro.
Recommended alternative mounting accessories:
- Command Strip Camera Mount: Amazon Link
- Adhesive Ball Head Mount (Option 1): Amazon Link
- Adhesive Ball Head Mount (Option 2): Amazon Link
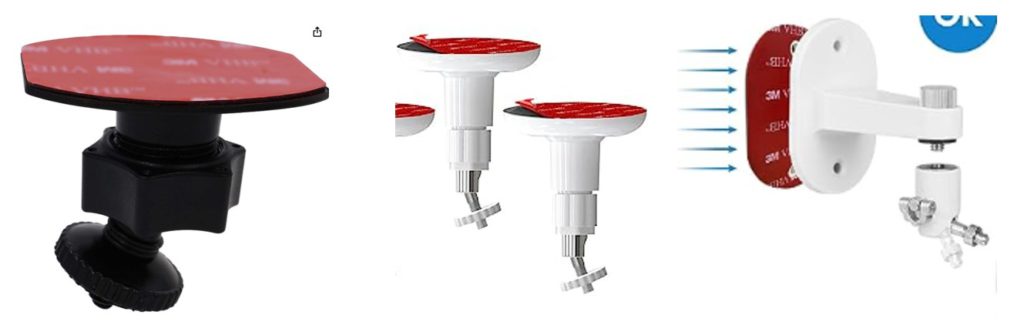
For damage-free mounting, you can also use removable 3M Command Hanging Strips, which peel away cleanly without damaging paint.
👉 Get 3M Command Refill Strips on Amazon
Step 5. Calibrate the Sensor
The sensor must accurately map the floor before its AI can correctly detect falls. You must redo the calibration if the sensor’s angle or physical position is changed.
⚠️ Critical Fall Zone Rule: The sensor only triggers alerts if a person lands on a calibrated floor area. Falling onto a sofa, couch, or bed will not trigger a notification.
- Preparation: Ensure the room is completely empty (for privacy) and stand within Bluetooth range. Remote recalibrations can be handled later from anywhere.
- Run Calibration: On the app’s sensor page, tap Calibrate. Select your mounting orientation (Upright or Upside-Down) and background style (Natural Mode or Privacy Mode), then tap Begin Calibration. This can take up to 30 seconds.
- Verify Coverage: Ensure the sensor angle captures a broad view of the floor. If the mapped floor area is too small, a warning will appear – adjust the physical sensor angle and tap Recalibrate.
- Edit & Save: If the AI misses a section of the floor or misidentifies furniture as floor space, manually paint with your finger to correct the green floor mask. Tap Save when finished.
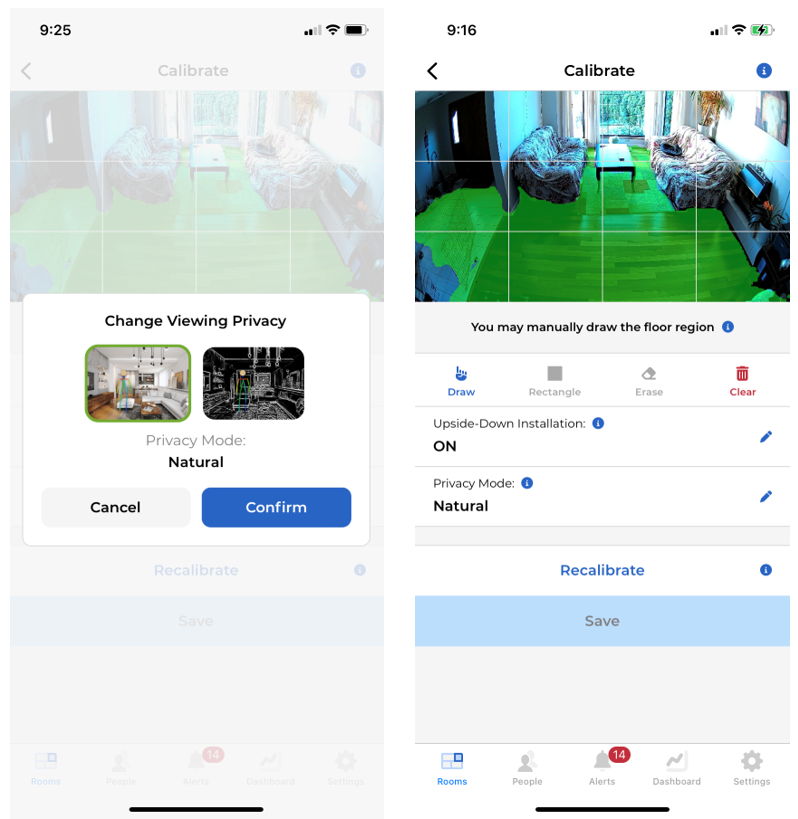
The following is a video demo of calibration using private mode:
Step 6. Add People (Optional)
To track individual health statistics, use specialized alerts like Bed-Exit detection, or receive personalized alerts showing exactly who needs help, you can configure the face-recognition feature.
- Go to the People tab in the app menu to create individual profiles.
- For the highest accuracy, upload clear photos of the individual’s head from multiple angles: a direct front view, 45-degree left/right profiles, and a slight top view.
The following is a video demo of adding person to an account:
That’s it!
Your Sentinare sensor is ready! It automatically monitors daily activities, tracks health statistics, and sends alerts for emergencies like falls. You can view live streams or review histories from the app.
For the user manual and demos of key features, visit the support page.